My father bought me my first and only sewing machine for Christmas about 14 years ago.
It isn't anything special. It didn't come with any extra feet, it doesn't do any fancy stitches, and it is kinda loud, but it has worked just great for what I have done so far. I do need to break down and buy a zipper foot. The first thing I sewed was a small baby quilt for my daughter who was less than one year old at the time.
As you can see is was not the most intricate design, but I felt proud to have made it. To be fair, my grandma helped me with it a lot. Since then I have sewn mostly costumes and a few curtains and small items of cloths.
This was 2009 in Hawaii. I was Sweeney Todd and Molly was a white Pikmin. Heath was Buckethead as always. The Pikmin costume was very fun to sew. The Sweeney Todd costume was my first try at drafting my own pattern. I couldn't find a double breasted vest pattern, so I tried to make one. It didn't turn out great, but for a costume piece it was all right.
I found a great vintage pants pattern, Butterick 3648, and some clearance wool fabric. You can't see it very well, but the pants have a fully authentic three button closure. I love these pants. I borrowed my aunt's sewing machine to do the button holes on the vest and the pants. Her machine is pretty amazing.

This is my favorite costume I've made so far: The Mad Hatter, Tim Burton's version with Johny Depp. The hair isn't exactly right and there wasn't really much sewing, but I did make the hat and trim and paint the jacket and pants. I won a 19 inch flat screen TV that year for best costume at the Monster Mash. My husband found those great boots for me at Goodwill. They are Dr. Martins. I still wear them. In case you haven't noticed. I dress as a man for Halloween probably about half of the time. I don't know why. I just usually get inspired by a movie or something. My Auntie Linda usually dresses as the other half of the couple. I wish I had a picture of my aunt's queen of hearts costume. It was amazing. She sewed the whole thing. She was my main competition for the best costume prize. When I made the Sweeney Todd costume, she made a really awesome Mrs. Lovitt costume. I will try to get the picture from her. We posed in a murder scene photo at the Monster Mash that year.

Please pay no attention to the ugly hat. I totally fixed that this year. The dress is one that I found the pattern for and just had to sew. It is kinda steam punk. I just liked it. All those pleats around the bottom took forever. I used 12 yards of the grey linen. The bustier zips up in the back and is almost as good as a corset for sucking in the belly.
This is the pattern: Simplicity 2172. The fabric I had was a bit on the drab side, but it is a nice sturdy linen, and I just love it anyways. The red lining is flashy and the bustier a is pretty black and gold fake brocade. The ruffles are just narrow hemmed organza. Narrow hemming those small strips was a pain, but worth it.
The most stressful, and yet rewarding sewing project I have done so far was a wedding dress. My cousin announced to us last summer that his girlfriend was about 5 months pregnant and that they were getting married in October. We all wanted the wedding to be special for them, even though the budget was very small, so we all pitched in. I volunteered to try and make a nice wedding dress. My husband did the music, and brought sound equipment. His mother made the invitations, cake, and flowers. I frosted the cake, but my aunt baked it, stacked it and decorated it. It turned out beautiful. She bought some rice paper printed butterflies on Etsy and stuck them on in a rainbow of colors.
Talk about getting distracted. This blog is supposed to be about sewing. Here is a picture of the lovely bride in her maternity wedding dress. She is about 8 months along.
I will try to put together a step by step post about this dress and the process. I think she liked it. It would have been way outside her budget to get a maternity wedding dress, so without a volunteer seamstress, no matter how inexperienced, she would have had to wear an off the rack non-wedding maternity dress. The fabric we got at Joann's was beautiful and it ended up fitting okay. She was growing and growing by the day until the last minute, as ladies at that stage of pregnancy do.
A couple of years ago, my aunt talked me into sewing myself a pioneer costume for her booth at the county fair. I sewed a little house on the prairie dress complete with underwear. Underwear is always my favorite part of every heritage outfit. I also sewed a bonnet and apron, of course. I will make a separate post for that, because, even though I was not blogging at the time, I have loads of pictures of it.

For Girl's Day this year we met at my house where we each made a square for a baby quilt and I put them together and gave them to the new girl in the family. My cousin's baby daughter, Lyra. She is about two months old now. She was born the night before Girl's Day. The above picture is just a picture of the process I used to decided where to put the squares. At the time I didn't have all the squares yet, so I had to change it around. Some of us made an applique polar bear, some made a four square patch. My mom did an embroidered polar bear and one of my sisters painted polar bears with fabric paints. She had to mail her two squares to me from Michigan. My sister-in-law did an applique heart and mailed it from Virginia. It was so nice that everyone participated and sent me squares, even though they couldn't make it to Girl's Day in person.
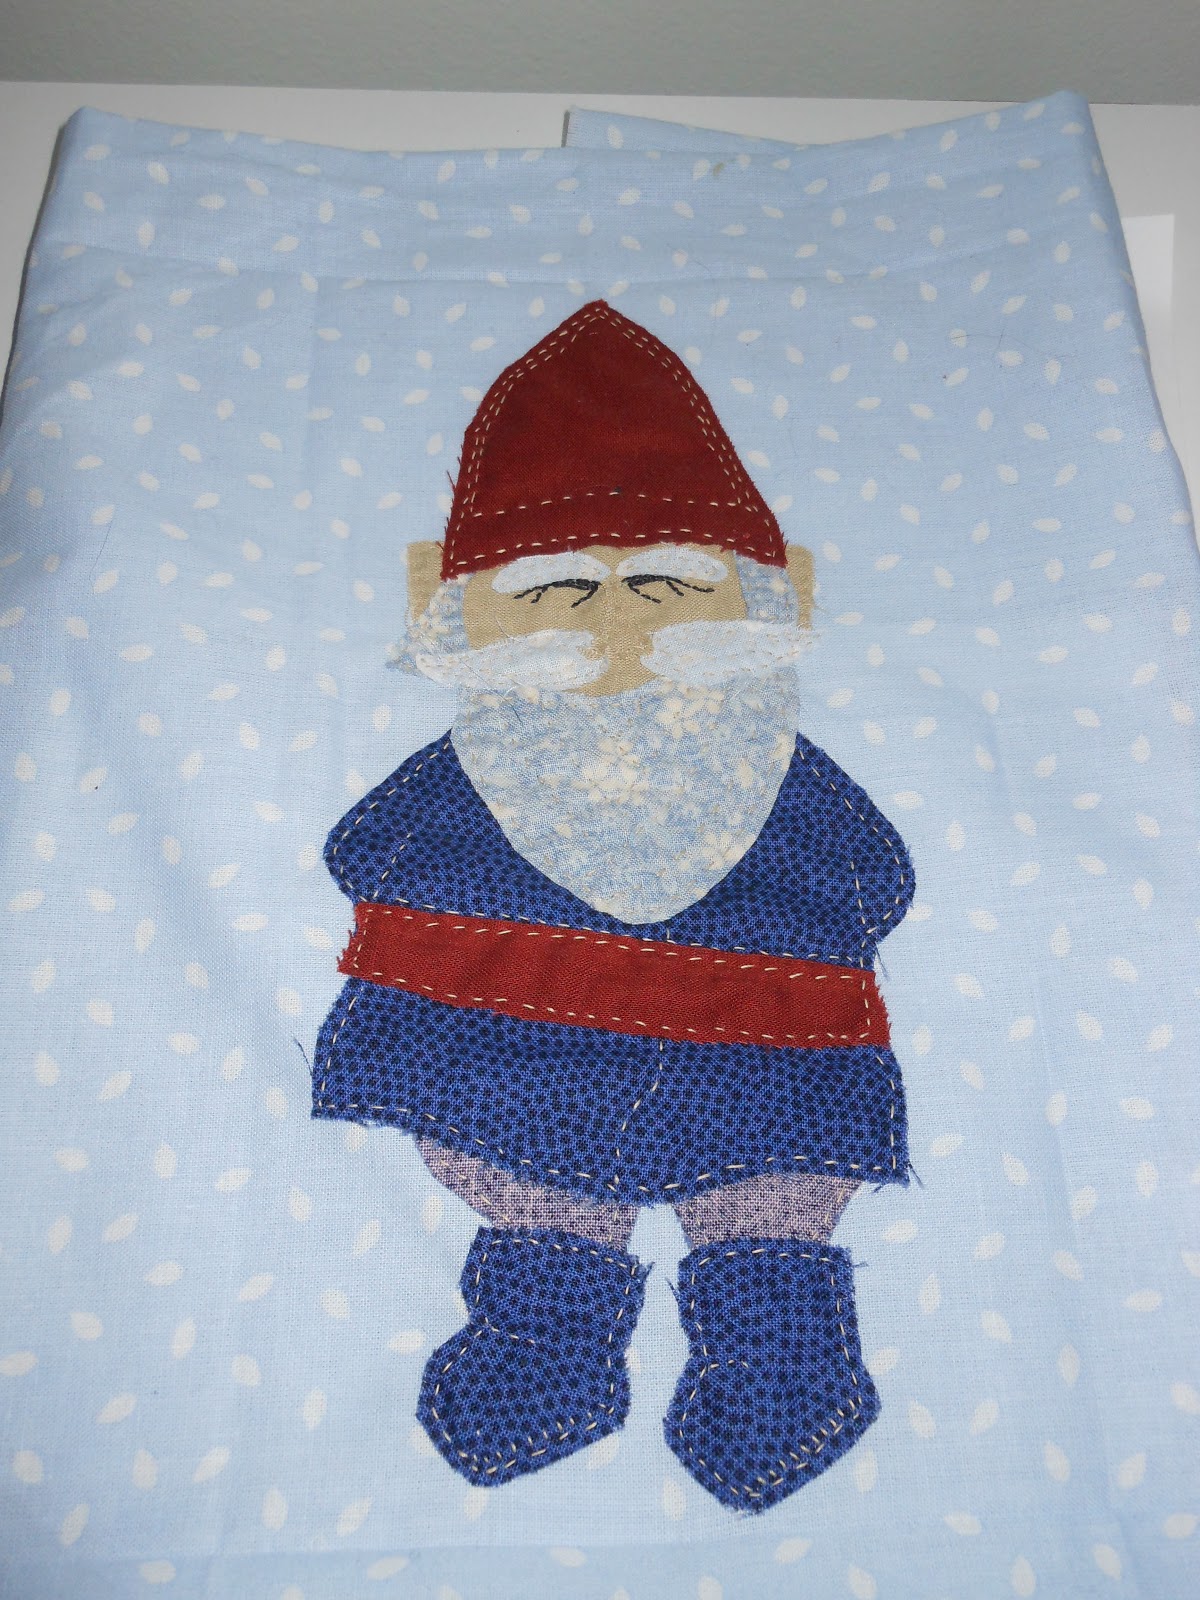
My other sister mailed this to me:
It is so cute, and it almost broke my heart, but I just couldn't put it in the quilt. The edges of the fabric are left raw and the stitches holding it in place are just hand sewn running stitch. It definitely wouldn't hold up in the wash, which is a must for a baby quilt. I decided to frame it and give it to Julie, Lyra's mother, as a wall hanging Helpful House Gnome. Gnomes are kind of my sister's thing. He is really cute. I wish I could have put him in the quilt. I couldn't think of a way to fix it without ruining it.
This is the quilt with the basting pins in it on the quilting frame that my mother-in-law let me borrow. I tied it with white cotton crochet thread, doing the center in the frame and then the edges on the floor. I then squared up the quilt with the rotary cutter and strait edge and sewed on a border. There are so many great resources with info about how to make a quilt. I used this video by Nancy Ellen for hand applique instructions:
I also watched this video for quilt tying instructions:
And used this video while I put the border on my quilt:
For some reason I didn't take a picture of the finished quilt. I will try to get one. I already gave the quilt to Lyra, but I see her all the time, so it shouldn't be too hard, as long as I remember.
I had bought a variety of fat quarters for people to choose from on Girl's Day and in the end we didn't end up using very much of it so I decided to use the rest to make log cabin squares for another baby quilt. So far I have finished making the squares, but it needs to be sewn together with a border to make it the right size before I can add the batting, backing and border and quilt it.
Here is my strip cutting station. The cutting mat is my Auntie Linda's. She found it at a yard sale we were both at. What a score. We sew and craft together a lot in my attic craft room, so lots of her crafting supplies and tools are here. It is very convenient for me.

Here are a few of the squares. I cut 1 1/2 inch strips so that with 1/4 inch seam allowances they are 1 inch "logs." The center squares are 2 inches when sewn. The squares are 8 1/2 inches total. There are 24 of them so the finished quilt will be 4 by 6 squares. I will have to add a border on the outside to make it the right size. I did half starting with a light color as the middle square and half starting with a dark color. That way I could use all the fabric left overs, long strips and short ones. I think they turned out pretty nice. I am thinking about trying my hand at actually hand quilting this one. I tied the Girl's Day quilt because I had to hurry and get it done. Babies do sometimes really like the ties on there, too. I don't have a deadline to finish this quilt, as I don't have an actual baby in mind. Maybe I'll finish it before the next baby is born in our family. I will wait for the next good sale on cotton quilt batting at Joann's and keep my eye open for a nice fabric for the back. Because it is a baby quilt, I don't need a seriously wide piece of fabric so I can do something cute.
These have been a few of my past projects. I will start new posts for my current projects and a few of my older ones that I actually have pictures of. Have a nice day. I will get to work on more posts.